
UniFi Controller Installation
Installing the UniFi Controller software as a service on Windows Server 2019 with AdoptOpenJDK.
2 min read
Contents
Preparation
To prepare, download all the necessary components:
- UniFi Network Controller 5.x.y for Windows (Link)
- AdoptOpenJDK Version 8, LTS, Hotspot (Link)
- Apache Commons Daemon (Link)
Problem
Setting up the controller as a Windows service is made a bit harder by the architecture and the use of AdoptOpenJDK 64-bit.
- Problem: the UniFi service controller (Apache Commons Daemon Service Runner) ships with a service config that doesn’t cope with the 64-bit JVM automatically.
- Problem: the UniFi setup routine installs the controller directory in the user profile of the executing user! Unfortunately, the support entry in the UniFi knowledge base is only of limited help here: Run the Controller as Windows Service
Solution
The cleanest service installation is therefore…
- Install AdoptOpenJDK and enable the option “Oracle Java Registry Keys” in the wizard.
- Extract the Apache Commons Daemon binaries to the directory
<C:\Program Files\Apache Commons Daemon\>. - Install the UniFi Controller and do the basic configuration.
- Stop the controller and move the entire “Ubiquiti UniFi” directory from the user profile to
<C:\Program Files\>. - Create the UniFi Controller service (see script below)
- Extract the current binaries for the Apache Commons Daemon and the zip file to the directory
<C:\Program Files\Apache Commons Daemon>.- The directory contains the service configuration tool “prunmgr.exe”
- Call the configuration tool prunmgr.exe with the parameter
//ES//UniFiand, on the tab- “Java”, set the Java Virtual Machine in the AdoptOpenJDK directory
<C:\Program Files\AdoptOpenJDK\jdk-8.0.x.y.z-hotspot\jre\bin\server\jvm.dll>(see screenshot below). - “Log on”, set the user “Local Service”. (Security, so that the controller process doesn’t run as “Local System”.)
- “Java”, set the Java Virtual Machine in the AdoptOpenJDK directory
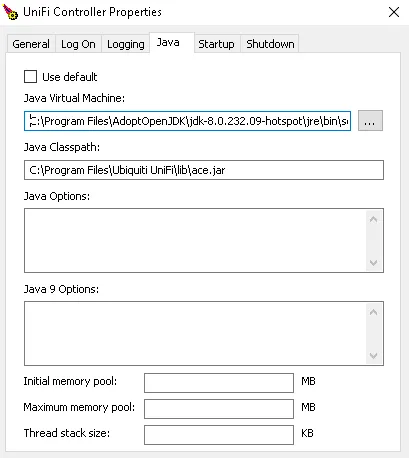
Here are a few more commands that make the process described above easier:
// Install service
cd "C:\Program Files\Ubiquiti UniFi\"
java.exe -jar lib\ace.jar installsvc
// Uninstall service
cd "C:\Program Files\Ubiquiti UniFi\"
java.exe -jar lib\ace.jar uninstallsvc
// Open the Apache Daemon service configuration tool
cd "C:\Program Files\Apache Commons Daemon\"
prinmgr.exe //ES//UniFiUpdate installation
For an update, the UniFi setup expects the installation to be located in the user profile (of the current user). We therefore link the UniFi directory there via a symbolic link:
New-Item -ItemType SymbolicLink -Path "$($env:USERPROFILE)\Ubiquiti UniFi" -Target "$($env:ProgramFiles)\Ubiquiti UniFi\"