Using Local AI with Ollama in VS Code
Integrating locally running AI models into Visual Studio Code with Ollama.
Contents
Introduction & Requirements
Many of my professional projects use AI - primarily Claude and OpenAI - for coding tasks as well. So over the last few days I asked myself whether, and how, AI can be run locally (on my PC or in the local network) and still be integrated into development projects in a useful way.
My requirements boil down to three points:
- The AI model must run locally, without an internet or cloud connection.
- The AI model must integrate with Visual Studio Code and offer the following features:
- Explain code
- Edit code
- Code autocompletion (“code suggestions”)
- Tool usage, for example to connect Model Context Protocol (MCP) servers
- The AI model(s) must be easy to swap and update.
The goal of this article is to show the basics of using local AI models with Ollama in practice, and how to integrate them into VS Code.
Basics - What Is Ollama and Why Is It Useful?
What Is Ollama?
Put simply, Ollama is an app for running AI models on a local device, with no dependency on a cloud provider. It is available for Linux, Mac and Windows and can be installed with all common package managers. Ollama supports all well-known LLMs and also lets you customize them via Modelfiles.
Why Use Local Models?
My main reason is privacy, which should be almost self-explanatory: data processed by locally running AI models doesn’t end up on a cloud provider’s servers.
I also experiment with different models and don’t want to take out a subscription with monthly costs for every provider.
Alternatives to Ollama
Of course, there are other solutions for running AI models locally. The best known are LocalAI and LM Studio.
Installation and Setup
Note: Running an AI model locally on your PC requires adequate hardware. 16 GB of memory (RAM) and a recent graphics card (GPU) with at least 8 GB of VRAM for small models should be the minimum; correspondingly more for larger models.
Installing Ollama
Ollama is easy to install with a package manager. On Mac via Homebrew…
brew install ollama… on Windows via WinGet…
winget install -e Ollama.Ollama… and afterwards ollama --version should print the current version.
Downloading and Running a Model
Next, pick a suitable model in the Ollama Library and copy its “model identifier”. I currently use these models:
- qwen3-coder: the 30b variant (
qwen3-coder:30b) runs satisfactorily on my hardware and, thanks to its generous context window (256K), suits larger projects. - devstral-small-2 is a new model from Mistral AI, and the ‘small’ 24b variant (
devstral-small-2:24b) is very efficient at coding. - gemma3: the ‘little sister’ of Google’s Gemini is a very efficient reasoning model, especially in the 12b QAT variant (quantization aware trained;
gemma3:12b-it-qat).
With the model identifier, we can tell Ollama to download the model…
ollama pull gemma3:12b-it-qat… or to run it interactively right away:
ollama run gemma3:12b-it-qatInstalling VS Code and the Copilot Chat Extension
Visual Studio Code is also easy to install with a package manager. On Mac via Homebrew…
brew install --cask visual-studio-code… on Windows via WinGet…
winget install -e Microsoft.VisualStudioCode… and afterwards code -v should print the current version.
We also need the “GitHub Copilot Chat” extension as the interface between VS Code and our Ollama AI model. We can install it with the following command:
code --install-extension github.copilot-chatMicrosoft Azure MCP Server
The Azure MCP Server can be installed either standalone with a package manager or as a VS Code extension. Since we are using VS Code anyway, we can make things easier and install the extension directly:
code --install-extension ms-azuretools.vscode-azure-mcp-serverNote: the Azure MCP Server requires the .NET 10 SDK!
In Practice - Ollama and VS Code Together
Selecting a Model in Copilot Chat
First we check with ollama list that the AI models we downloaded are available in Ollama:
ollama list

NAME                       ID              SIZE      MODIFIED
qwen3-coder:30b            06c1097efce0    18 GB     2 hours ago
gemma3:12b-it-qat          5d4fa005e7bb    8.9 GB    6 hours ago
devstral-small-2:latest    24277f07f62d    15 GB     2 days ago
If a model is missing, download it with ollama pull <model-identifier>. Once all the models you want are in Ollama, start VS Code and open the Copilot Chat model configuration - either via Ctrl-Shift-P > Chat: Manage Language Models or via the model picker dropdown in the chat GUI:
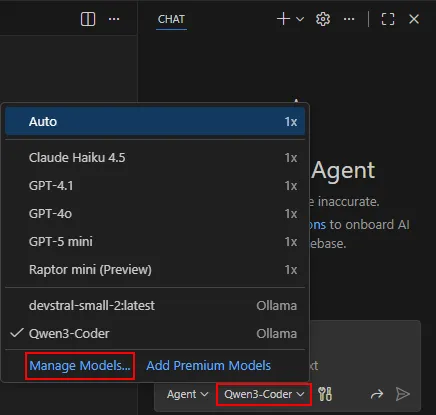 Figure 1: Copilot Chat model selection
In the model picker, VS Code automatically lists all models available in Ollama. The “show/hide” icon to the left of the model name controls whether it can be selected in Copilot Chat:
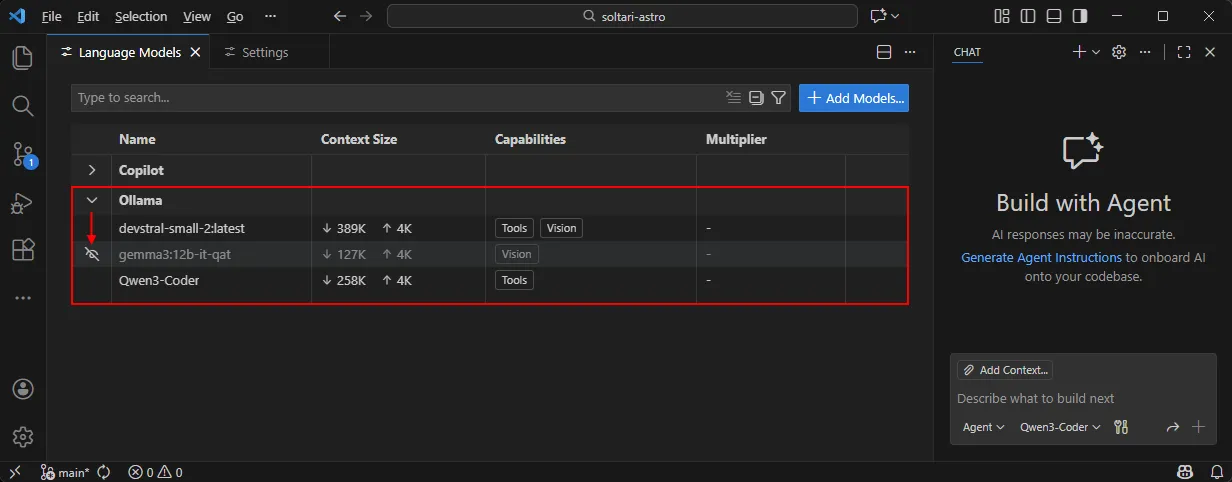 Figure 2: Copilot Chat model configuration
Once the models are listed in the model picker (see Fig. 1), they are available for Copilot Chat.
Code Debugging and Questions
To have our AI model explain a piece of code, select the code and start the action with Ctrl-Shift-P > Chat: Explain (or right-click > Explain). VS Code automatically passes the selected code as “context”. The model’s output lands in the chat window:
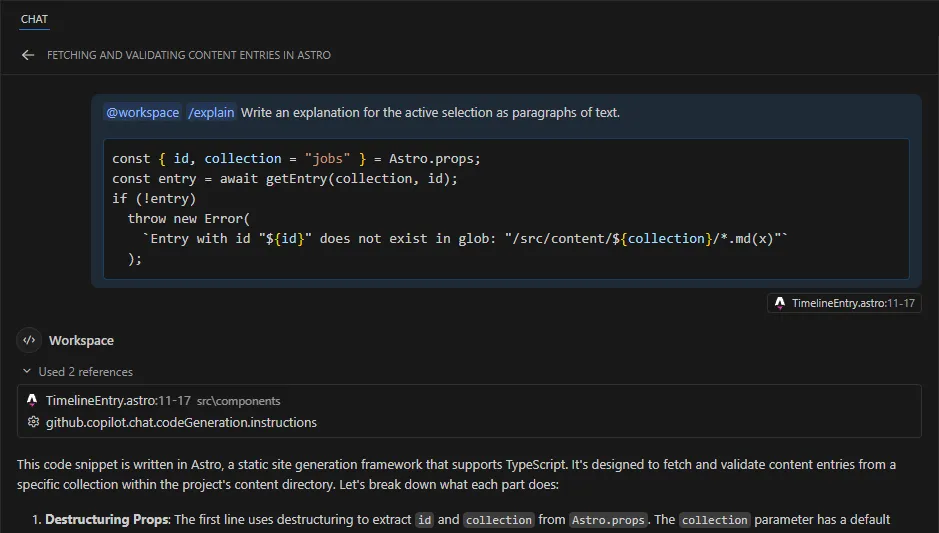 Figure 3: Explain Code
Ctrl-Shift-P > Chat: Review starts an interactive “code review”, and Ctrl-Shift-P > Chat: Fix starts an AI debugging session. Here VS Code automatically passes all detected warnings and errors to the AI model as “context”:
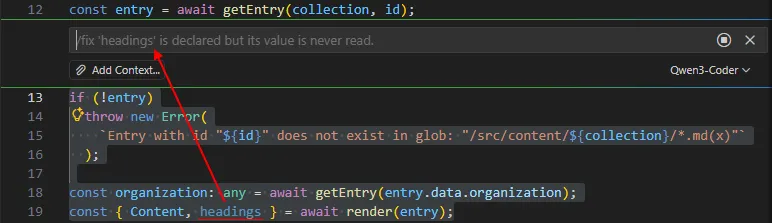 Figure 4: Fix Code
The AI model creates a code suggestion, shows the changes “inline” and waits for confirmation:
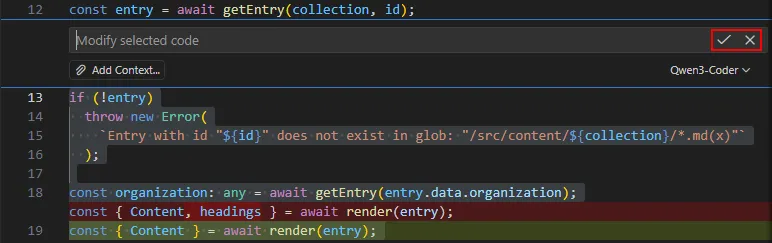 Figure 5: Confirm Fix Code
One important warning at this point: AI-generated code can and will(!) contain errors. Review generated code thoroughly, and don’t use code in production that you don’t understand!
Code Suggestions & Autocompletion
At the time of writing (December 2025) there is no way to connect VS Code’s inline suggestions to a local AI model:
Currently, you cannot connect to a local model for inline suggestions. VS Code provides an extension API InlineCompletionItemProvider that enables extensions to contribute a custom completion provider. You can get started with our Inline Completions sample.
This article will be updated once this limitation is lifted.
MCP Servers and Tool Usage
With Model Context Protocol (MCP) servers, our AI model can use so-called “tools” to access information and systems outside the Copilot chat window, so to speak. In the following example we use the Azure MCP Server to give the AI model access to resources in Azure.
If the MCP server was installed as a VS Code extension as described above, it is already integrated and its tools should be listed directly in Copilot Chat:
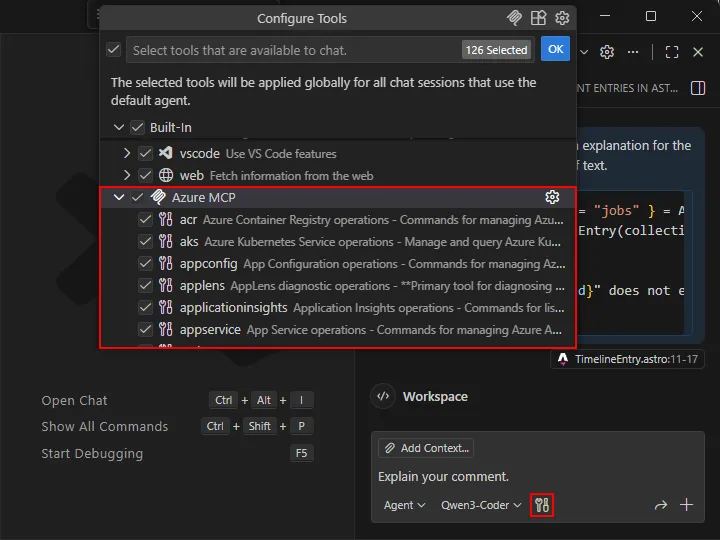 Figure 6: Azure MCP Server tools
To use the Azure MCP Server tools, the Azure CLI needs a valid authentication token. That means we first sign in with az login, and can then instruct our AI model to access Azure resources through the MCP Server tools, for example with the simple command ‘List my Azure resource groups’:
> List my Azure resource groups

I'll help you list your Azure resource groups. Let me use the appropriate Azure CLI command to retrieve this information.
❌ Ran List Resource groups - com.microsoft/azure (MCP Server)

It seems there was an issue with retrieving the subscription information. The error indicates that the subscription with the name ${AZURE_SUBSCRIPTION_ID} could not be found. This is likely because the subscription ID is not properly set in the environment.
...
Here the AI model noticed that the List Resource groups tool expects an Azure subscription ID as a parameter. Since the Azure MCP Server also provides a List Azure Subscription tool, the AI was able to solve the problem itself:
...
Let me first check what subscriptions are available in your Azure account:
✅ Ran List Azure Subscriptions - com.microsoft/azure (MCP Server)

Now I'll list the resource groups using the subscription ID that was found:
✅ Ran List Resource Groups - com.microsoft/azure (MCP Server)

Azure Resource Groups
Based on the Azure subscription information, I've found the following resource groups in your environment:

rg-***-tc9j - Located in germanywestcentral
rg-***-demo - Located in northeurope
...
Conclusion
- Ollama makes running local AI models much simpler.
- Integrating these AI models into the Visual Studio Code development environment with the Copilot Chat extension is also very easy.
- Connecting MCP servers additionally lets the AI models access resources outside VS Code, which significantly expands what’s possible.
- VS Code’s limitation of not allowing local AI models for code suggestions is surprising, but I expect this feature to be added soon.