
Microsoft Entra ID API-driven Provisioning
Automating user provisioning in Entra ID with Microsoft's new 'inbound provisioning' API.
Contents
Note: This article was originally published for evoila under API-driven Provisioning with Microsoft Entra and Azure Logic Apps .
Last August, Microsoft announced a new feature, “API-driven provisioning”, for its “Entra ID” identity management solution1. This API enables automated provisioning of user accounts, in Entra and Active Directory, from any trusted data source such as an HCM software. API-driven provisioning is based on the SCIM standard2 and is intended to be used in combination with Entra lifecycle workflows3.
The provisioning data flow, as outlined in Figure 1, includes:
- An “identity directory” containing data about internal and external employees. Usually an HR/HCM system.
- An automation tool such as PowerShell, Azure runbooks or Logic Apps to load data from the “identity directory”, create a SCIM document and send it to the API endpoint.
- The Entra “provisioning service” processes the SCIM document and creates, updates or removes objects in Microsoft Entra or Active Directory.
- If an on-premises Active Directory is in use, a locally installed “provisioning agent”.
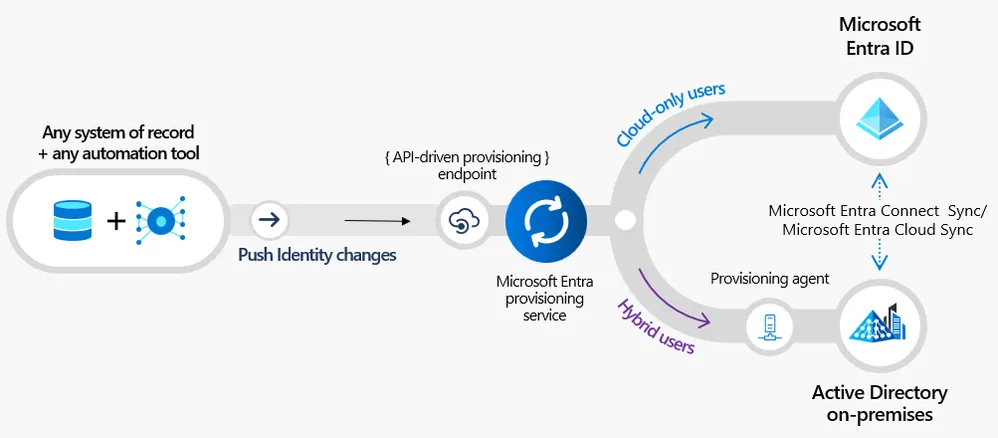 Figure 1: Microsoft Entra API-driven provisioning data flow
In this article, we describe a simple implementation of API-driven provisioning with Logic Apps. It is meant as an example, or starting point, for your own implementation and is loosely based on Microsoft’s “QuickStart with Azure Logic App”.4
For Workday HCM and SuccessFactors, Microsoft offers its own integration that you don’t have to implement yourself:
Prerequisites
Licensing
API-driven provisioning requires Microsoft Entra ID P1 (formerly “Azure Active Directory P1”) licenses.
Azure resources
For our example, we need a few Azure resources:
- A resource group “rg-HcmProvisioning” as a logical container for our resources.
- An Azure Storage account “sthcmprovisioning<NNNN>” with a storage table5 “employeedemo” for our sample data set.
- A Logic App “logic-HcmProvisioning” for our workflow.
To create the resources you can use the Azure CLI, PowerShell or the portal. Creating the Logic App with PowerShell or the CLI requires a “workflow definition”6, which you can find in the appendix below.
We use a PowerShell script to create the resources:
$ProjectName = "HcmProvisioning"
$Location = "westeurope" # Azure region for our resources
$RandomId = Get-Random -Minimum -1000 -Maximum 9999 # We'll use this to make our storage account name globally unique
$StorageName = "st" + $ProjectName.ToLower() + $RandomId
$StorageTableName = "employeedemo"
$ResourceGroupName = "rg-$ProjectName"
$LogicAppName = "logic-$ProjectName"
# Create a resource group for our Azure resources
New-AzResourceGroup -Location $Location -Name $ResourceGroupName
# Create the storage account...
$StorageAccount = New-AzStorageAccount -ResourceGroupName $ResourceGroupName -Name $StorageName -Location $Location -SkuName "Standard_LRS"
# ... and our employee table
$StorageContext = $StorageAccount.Context
New-AzStorageTable -Name $StorageTableName -Context $StorageContext
# Create a Logic App, based on our "empty" workflow definition
$LogicApp = New-AzLogicApp -ResourceGroupName $ResourceGroupName -Name $LogicAppName -Location $Location -DefinitionFilePath "./workflow-definition.json"HCM data source
For the example, we use the Azure storage table “employeedemo” that we just created in the Azure Storage account. We download Microsoft’s sample data set from GitHub and import it into the table with Azure Storage Explorer.
After the import, the table content looks like this (reduced to the relevant columns):
| Company | CostCenter | Department | Devision | FirstName | FullName | LastName |
|---|---|---|---|---|---|---|
| Woodgrove | CC3035 | Sales | Electronics | Talya | Talya Fleeta | Fleeta |
| Woodgrove | CC3035 | Sales | Electronics | Miriam | Miriam Dunware | Dunware |
| Woodgrove | CC3035 | Product Engineering | Logistics | Ginnie | Ginnie Fadiman | Fadiman |
| Fabrikam | CC5081 | Sales | Sales | Genevra | Genevra Melony | Melony |
| Woodgrove | CC3035 | Manufacturing | Pharma | Nyssa | Nyssa Roscoe | Roscoe |
Microsoft Entra API-driven provisioning App
To enable “API-driven provisioning” in an Entra tenant, an “Enterprise Application” has to be added from the gallery. Sign in to the Microsoft Entra Admin Center and navigate to Identity > Applications > Enterprise applications.
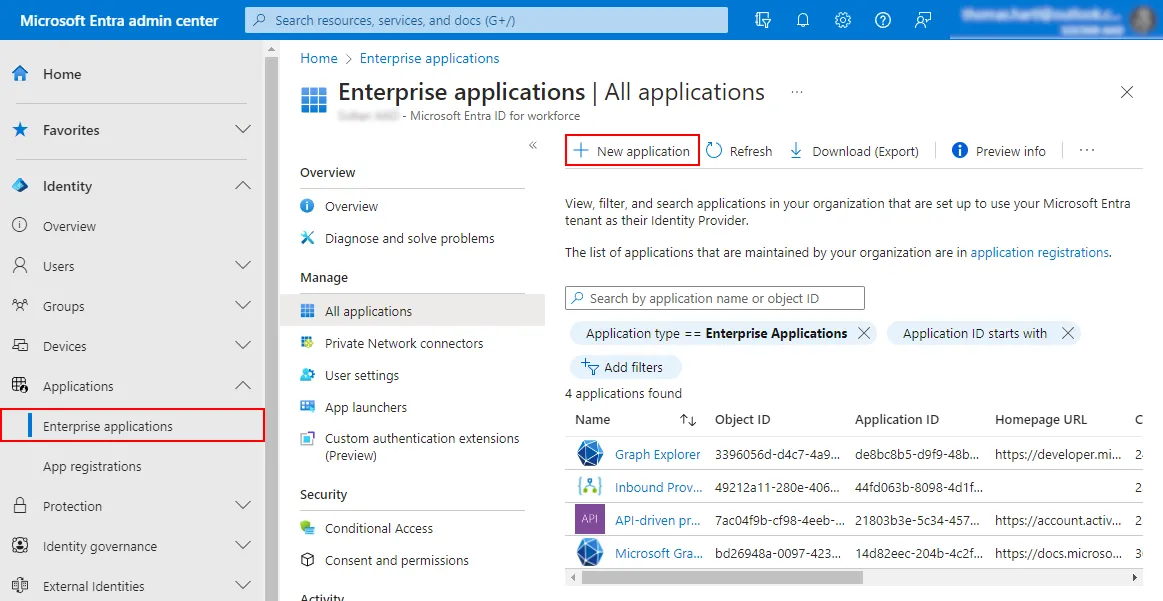 Figure 2: Add an enterprise application
Select “New application”, enter “API-driven” in the search box and then select the application “API-driven provisioning to Microsoft Entra ID”. Keep the default settings and click “Create”.
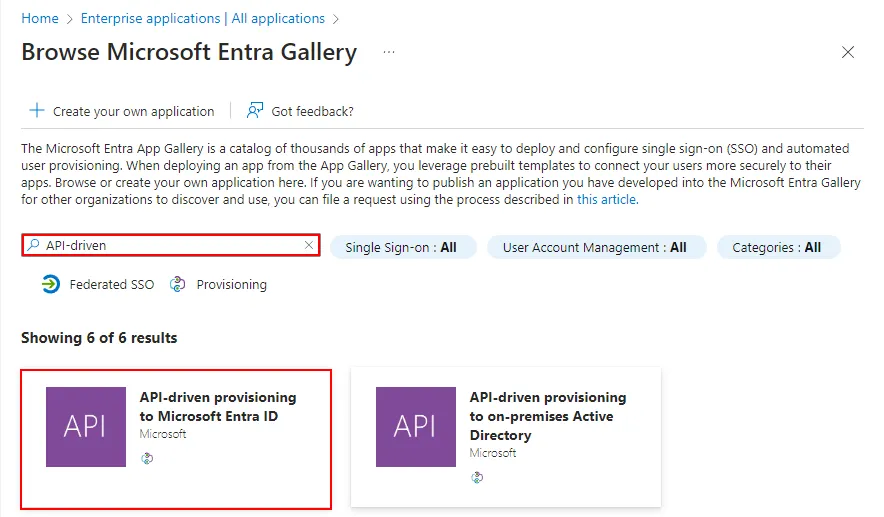 Figure 3: Search for the API-driven provisioning app
Open the newly created app and switch to the “Provisioning” menu (Fig. 4). Click “Get started” in the “Provision User Accounts” tile, set the “Provisioning Mode” to “Automatic” and save the settings.
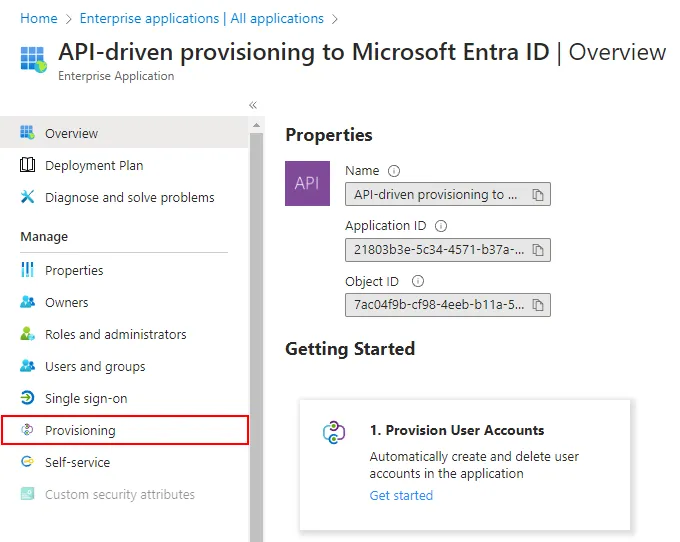 Figure 4: Enable provisioning
After the initial configuration has been created, you can see additional options in the left menu under “Provisioning” (Fig. 5):
- Mappings control the mapping of data fields between the data source and Microsoft Entra. The default settings are sufficient for our demo.
- Under Settings, a valid email address for notifications should be entered. You can also set a threshold here to prevent the accidental deletion of many user accounts.
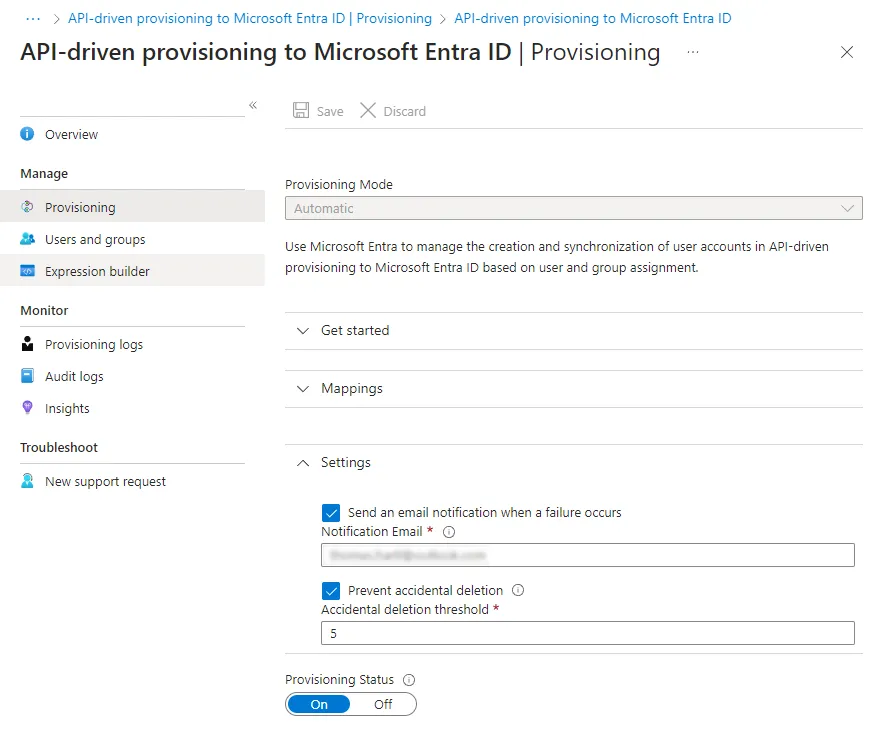 Figure 5: Provisioning settings
Logic App Managed Identity
The Azure Logic App will use a “service principal” to authenticate to Microsoft Entra. To do so, we enable the “system-assigned managed identity”7 in our Logic App. Then we use PowerShell to grant the managed identity the necessary MS Graph permissions.
Open the Logic App resource in the Azure portal and navigate to “Identity” (Fig. 6). Change the status to “On” and click “Save” to create a managed identity. The managed identity gets the same name as the Logic App (“logic-HcmProvisioning”) in Entra.
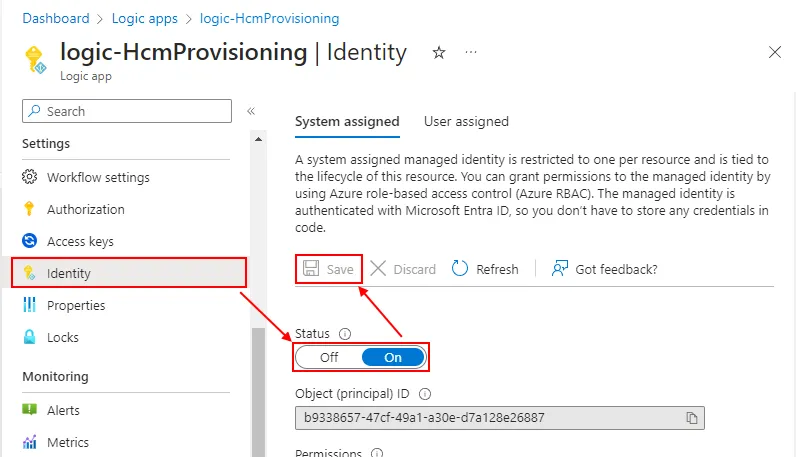 Figure 6: Enable the managed identity
In the next step, we use a PowerShell script and the MS Graph API to give the service principal the necessary permissions8:
- SynchronizationData-User.Upload allows the Logic App to upload data to the Identity Synchronization Service.
- AuditLog.Read.All allows the Logic App to read log entries in the audit log.
Install-Module -Name "Microsoft.Graph" -Scope AllUsers
Connect-MgGraph -Scopes "Application.Read.All","AppRoleAssignment.ReadWrite.All,RoleManagement.ReadWrite.Directory"
$GraphApp = Get-MgServicePrincipal -Filter "AppId eq '00000003-0000-0000-c000-000000000000'"
# Find our Logic App's managed service principal
$ManagedSp = Get-MgServicePrincipal -Filter "DisplayName eq '$LogicAppName'" # the service principal has the same name as the logic app we created earlier
# Search for app role permission "SynchronizationData-User.Upload" and assign it to our service principal
$PermissionName = "SynchronizationData-User.Upload"
$AppRole = $GraphApp.AppRoles | Where-Object {$_.Value -eq $PermissionName -and $_.AllowedMemberTypes -contains "Application"}
New-MgServicePrincipalAppRoleAssignment -PrincipalId $ManagedSp.Id -ServicePrincipalId $ManagedSp.Id -ResourceId $GraphApp.Id -AppRoleId $AppRole.Id
# Search for app role permission "AuditLog.Read.All" and assign it to our service principal
$PermissionName = "AuditLog.Read.All"
$AppRole = $GraphApp.AppRoles | Where-Object {$_.Value -eq $PermissionName -and $_.AllowedMemberTypes -contains "Application"}
New-MgServicePrincipalAppRoleAssignment -PrincipalId $ManagedSp.Id -ServicePrincipalId $ManagedSp.Id -ResourceId $GraphApp.Id -AppRoleId $AppRole.IdAdditionally, we allow the Logic App to read our data source (Azure Storage Table):
New-AzRoleAssignment -PrincipalId $ManagedSp.Id -RoleDefinitionName "Storage Table Data Reader" -ResourceName $StorageName -ResourceType "Microsoft.Storage/storageAccounts" -ResourceGroupName $ResourceGroupName You can check the MS Graph permissions of the service principal in Entra by selecting the app “logic-HcmProvisioning” under “Enterprise Application” (remove the filter “Application type == Enterprise application” if necessary):
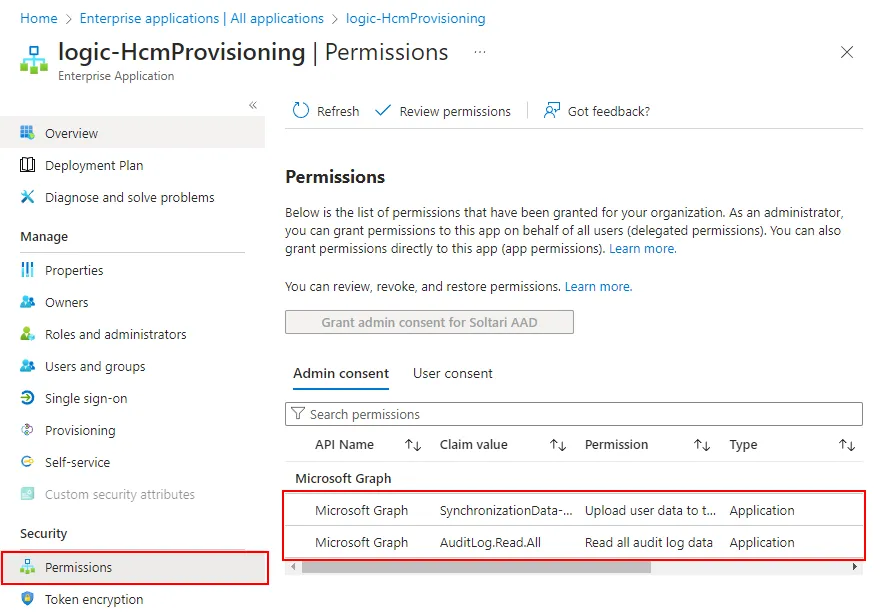 Figure 7: Service principal permissions
You can see the “Storage Table Data Reader” permission in the Azure portal in the “Storage account” resource under “Access Control (IAM) > Role Assignments”:
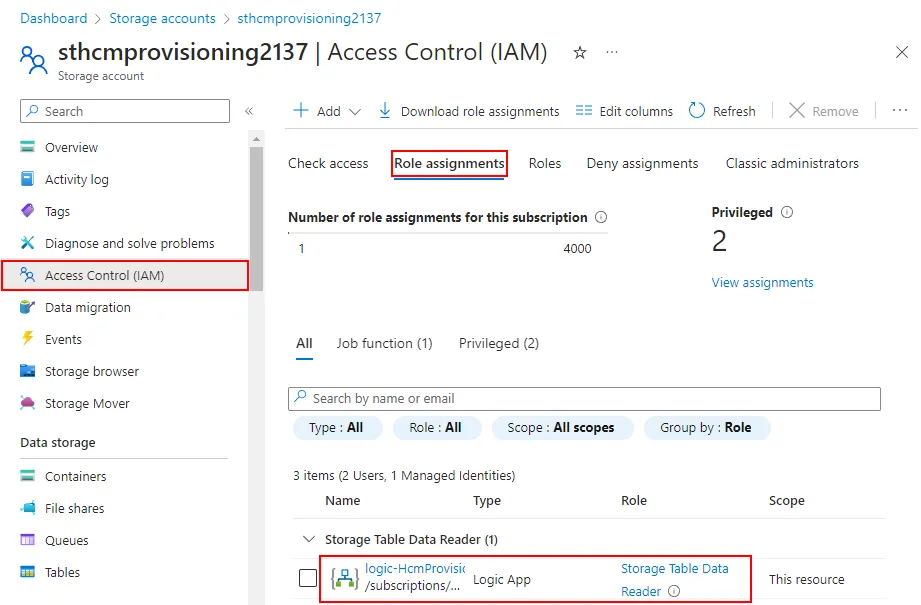 Figure 8: Service principal roles
Configure the Logic App workflow
Open the Logic App Designer
Now that we have met and configured all the prerequisites, we can finally start developing our Logic App workflow. Navigate to the Logic App in the Azure portal and open the “Logic App Designer”. Currently, the Logic App consists of only two steps:
- A trigger “Recurrence 0500am every day”, which starts the workflow every day at 05:00 UTC+1
- and an action “Compose ProvisioningAPI Settings”, which creates a JSON object that we need later.
Define the API properties
Edit the “Compose ProvisioningAPI Settings” action and replace the “Uri” entry with your own “Provisioning API Endpoint”. You can find this information in the “API-drive provisioning to Microsoft Entra ID” enterprise application, under Provisioning > Overview > View technical information.
The action should now look roughly like this:
{
  "Audience": "https://graph.microsoft.com",
  "Uri": "https://graph.microsoft.com/beta/servicePrincipals/abdefghi-1234-5678-jklm-nopqrstuvwxy/synchronization/jobs/API2AAD.b649b126ed68488484d86210336bb33f.21803b3e-5c34-4571-b37a-bc1ce9ec3556/bulkUpload"
}
Read the data source
Add another action “Get entities (V2)” of the type “Azure Table Storage”. Enter a name for the connection object (e.g. “conn-sthcmprovisioning”), select “Logic Apps Managed Identity” as the authentication type and then click “Create.”
Under Parameters
- for Storage Account Name, select “enter custom value” and enter the name of your Azure Storage account (e.g. “sthcmprovisioning1234”)
- for Table, select “employeedemo” in the drop-down.
To make the workflow easier to read, click the title of the action and change the name to “Get employee data from storage table”.
Create SCIM objects
We have to create a SCIM/JSON object for each entry in the data source. To do that,
- create a “For each” action of the type “Control”,
- select “Get entities result / List of Entities” as the parameter,
- change the name of the “For each” action to “For each employee”.
Then create another action inside the “For each employee” block:
- This time we need a “Compose” action of the type “Data Operations”.
- Change the name to “Compose employee SCIM”.
- Copy the JSON code below into the “Inputs” field. The code contains a SCIM schema that maps the fields of our data source to Microsoft Entra (e.g.
FullName=>displayName). It also sets theactivestatus based on the fieldWorkerStatusin our data source.
{
  "bulkId": "@{guid()}",
  "data": {
    "schemas": [
      "urn:ietf:params:scim:schemas:core:2.0:User",
      "urn:ietf:params:scim:schemas:extension:enterprise:2.0:User"
    ],
    "userName": "@{items('For_each_employee')?['UserID']}",
    "displayName": "@{items('For_each_employee')?['FullName']}",
    "externalId": "@{items('For_each_employee')?['WorkerID']}",
    "name": {
      "familyName": "@{items('For_each_employee')?['LastName']}",
      "givenName": "@{items('For_each_employee')?['FirstName']}"
    },
    "active": @{if(equals(items('For_each_employee')?['WorkerStatus'],'Active'),true,false)}
  },
  "method": "POST",
  "path": "/Users"
}
The action should now look like this:
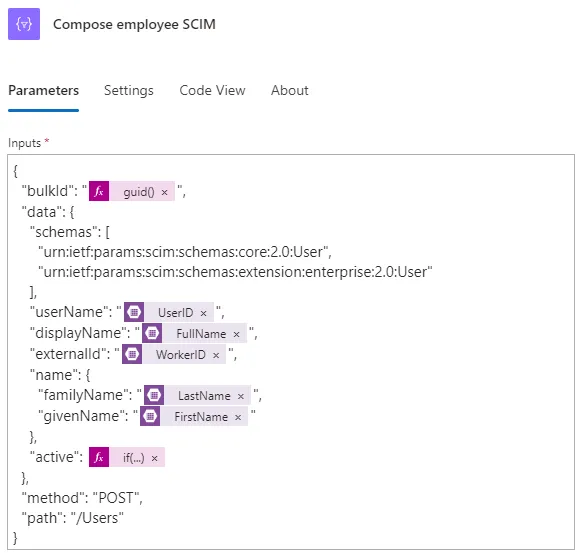
Figure 9: Create a SCIM object
Combine SCIM objects
Now we have to combine the individual SCIM objects into a single bulk SCIM document that contains the data of all employees
To do so, create a new “Join” action of the type “Data Operations”,
- click the “From” parameter and select insert expression
- paste
outputs('Compose_employee_SCIM')into the text field and click “Update”. - Use a comma (“,”) for the “Join With” parameter.
- Change the name of the action to “Join employee SCIM”.
Then create another “Compose” action. Here we use a combination of JSON syntax and Logic App expressions to create our SCIM document.
- Name the action “Compose SCIM bulk payload”
- and copy the following JSON code into the Inputs field:
{
  "schemas": [
    "urn:ietf:params:scim:api:messages:2.0:BulkRequest"
  ],
  "Operations": @{json(concat('[',body('Join_employee_SCIM'),']'))},
  "failOnErrors": null
}
Send the SCIM document to the API
In the last step of our workflow, we send our SCIM document to the API endpoint.
Add a new “HTTP” action and
- use the expression
outputs('Compose_ProvisioningAPI_Settings')?['Uri']as the URI, - select POST as the method,
- in the “Headers” section, add a new entry
Content-Typewith the valueapplication/scim+json, - use the “Compose SCIM bulk payload” action as the body,
- select “Managed Identity” as the authentication type
- and add the expression
outputs('Compose_ProvisioningAPI_Settings')?['Audience']in the Audience field.
Change the name of the action to “POST SCIM payload to API”.
You can find the complete workflow definition in the appendix of this article.
Provisioning logs
We are now ready to run the Logic App workflow. Click “Run” and wait until the workflow has sent the SCIM document to the API endpoint. As the result of the “POST SCIM payload to API” action you should see “HTTP Status 202 (Accepted)”. This means the API has received the request and will start processing it shortly.
In the meantime, navigate to the API-driven inbound provisioning application in Microsoft Entra. Click “Provisioning” and then open the “Provisioning Logs” to display details about the provisioning operations, as shown in Figure 10:
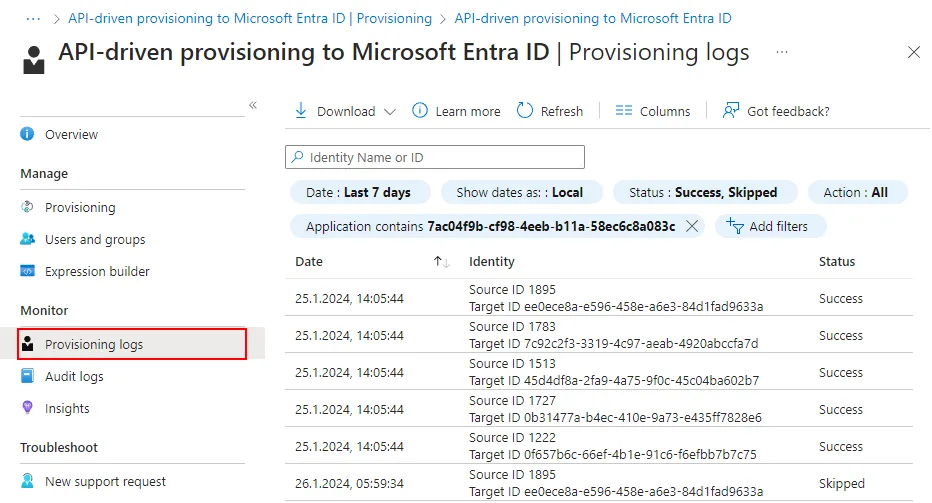 Figure 10: Provisioning logs
Next steps
Now that you have seen our sample implementation, you may be wondering how to use your own HR data and connect your own “identity directory”…
Thanks to the flexibility of Azure Logic Apps and the large number of available connectors, you are not limited to using Azure Tables as a data source. Here are a few alternative scenarios for data sources that you could connect in your own environment:
- CSV files on an SFTP server using the SFTP connector
- Tables in a relational database (Azure SQL, on-premises SQL, Oracle or PostgreSQL)
- SAP, either on-premises or in the cloud using the SAP connector.
- Message queuing systems such as Azure Service Bus or IBM MQ.
- Any application that exposes RESTful APIs, by creating your own “custom connector”.
The example shown here can serve as a basis for further Entra lifecycle workflows9 (“joiner-mover-leaver” processes).
Sources
- Microsoft Tech Community: Introducing a New Flexible Way of Bringing Identities from Any Source into Microsoft Entra ID!
- System for Cross-domain Identity Management: SCIM 2, the open API for managing identities is now complete and published under the IETF.
- Microsoft Entra ID Governance: What are lifecycle workflows?
- API-driven inbound provisioning tutorials: Quickstart with Azure Logic App
- Azure Storage: What is Azure Table storage?
- Logic Apps: Workflow definition language
- Managed identities for Azure resources: What are managed identities for Azure resources?
- Permissions for API-driven provisioning: Grant access to the inbound provisioning API
- Microsoft Entra ID Governance: Understanding lifecycle workflows
Appendix
Workflow definition (empty)
To create an Azure Logic App with PowerShell or the Azure CLI, a “workflow definition” has to be specified. You can use the following “empty” workflow definition to create a simple workflow with one trigger and one action:
{
  "$schema": "https://schema.management.azure.com/providers/Microsoft.Logic/schemas/2016-06-01/workflowdefinition.json#",
  "actions": {
    "Compose_ProvisioningAPI_Settings": {
      "inputs": {
        "Audience": "https://graph.microsoft.com",
        "Uri": "<Your API-driven inbound provisioning URI>"
      },
      "runAfter": {},
      "type": "Compose"
    }
  },
  "contentVersion": "1.0.0.0",
  "outputs": {},
  "parameters": {
    "$connections": {
      "defaultValue": {},
      "type": "Object"
    }
  },
  "triggers": {
    "Recurrence_0500am_every_day": {
      "evaluatedRecurrence": {
        "frequency": "Day",
        "interval": 1,
        "schedule": {
          "hours": ["5"]
        },
        "timeZone": "W. Europe Standard Time"
      },
      "recurrence": {
        "frequency": "Day",
        "interval": 1,
        "schedule": {
          "hours": ["5"]
        },
        "timeZone": "W. Europe Standard Time"
      },
      "type": "Recurrence"
    }
  }
}
Workflow definition (complete)
You can use the following (anonymized) workflow definition as a reference for your own workflow:
{
  "$schema": "https://schema.management.azure.com/providers/Microsoft.Logic/schemas/2016-06-01/workflowdefinition.json#",
  "actions": {
    "Compose_ProvisioningAPI_Settings": {
      "inputs": {
        "Audience": "https://graph.microsoft.com",
        "Uri": "https://graph.microsoft.com/beta/servicePrincipals/abdefghi-1234-5678-jklm-nopqrstuvwxy/synchronization/jobs/API2AAD.b649b126ed68488484d86210336bb33f.21803b3e-5c34-4571-b37a-bc1ce9ec3556/bulkUpload"
      },
      "runAfter": {},
      "type": "Compose"
    },
    "Compose_SCIM_bulk_payload": {
      "inputs": {
        "Operations": "@json(\r\n  concat('[',body('Join_employee_SCIM'),']')\r\n)",
        "failOnErrors": null,
        "schemas": ["urn:ietf:params:scim:api:messages:2.0:BulkRequest"]
      },
      "runAfter": {
        "Join_employee_SCIM": ["Succeeded"]
      },
      "type": "Compose"
    },
    "For_each_employee": {
      "actions": {
        "Compose_employee_SCIM": {
          "inputs": {
            "bulkId": "@{guid()}",
            "data": {
              "active": "@if(equals(items('For_each_employee')?['WorkerStatus'],'Active'),true,false)",
              "displayName": "@{items('For_each_employee')?['FullName']}",
              "externalId": "@{items('For_each_employee')?['WorkerID']}",
              "name": {
                "familyName": "@{items('For_each_employee')?['LastName']}",
                "givenName": "@{items('For_each_employee')?['FirstName']}"
              },
              "schemas": [
                "urn:ietf:params:scim:schemas:core:2.0:User",
                "urn:ietf:params:scim:schemas:extension:enterprise:2.0:User"
              ],
              "userName": "@{items('For_each_employee')?['UserID']}"
            },
            "method": "POST",
            "path": "/Users"
          },
          "type": "Compose"
        }
      },
      "foreach": "@body('Get_employee_data_from_storage_table')?['value']",
      "runAfter": {
        "Get_employee_data_from_storage_table": ["Succeeded"]
      },
      "type": "Foreach"
    },
    "Get_employee_data_from_storage_table": {
      "inputs": {
        "host": {
          "connection": {
            "name": "@parameters('$connections')['azuretables']['connectionId']"
          }
        },
        "method": "get",
        "path": "/v2/storageAccounts/@{encodeURIComponent(encodeURIComponent('sthcmprovisioning1234'))}/tables/@{encodeURIComponent('employeedemo')}/entities"
      },
      "runAfter": {
        "Compose_ProvisioningAPI_Settings": ["Succeeded"]
      },
      "type": "ApiConnection"
    },
    "Join_employee_SCIM": {
      "inputs": {
        "from": "@outputs('Compose_employee_SCIM')",
        "joinWith": ","
      },
      "runAfter": {
        "For_each_employee": ["Succeeded"]
      },
      "type": "Join"
    },
    "POST_SCIM_payload_to_API": {
      "inputs": {
        "authentication": {
          "audience": "@{outputs('Compose_ProvisioningAPI_Settings')?['Audience']}",
          "type": "ManagedServiceIdentity"
        },
        "body": "@outputs('Compose_SCIM_bulk_payload')",
        "headers": {
          "Content-Type": "application/scim+json"
        },
        "method": "POST",
        "uri": "@outputs('Compose_ProvisioningAPI_Settings')?['Uri']"
      },
      "runAfter": {
        "Compose_SCIM_bulk_payload": ["Succeeded"]
      },
      "type": "Http"
    }
  },
  "contentVersion": "1.0.0.0",
  "outputs": {},
  "parameters": {
    "$connections": {
      "defaultValue": {},
      "type": "Object"
    }
  },
  "triggers": {
    "Recurrence_0500am_every_day": {
      "evaluatedRecurrence": {
        "frequency": "Day",
        "interval": 1,
        "schedule": {
          "hours": ["5"]
        },
        "timeZone": "W. Europe Standard Time"
      },
      "recurrence": {
        "frequency": "Day",
        "interval": 1,
        "schedule": {
          "hours": ["5"]
        },
        "timeZone": "W. Europe Standard Time"
      },
      "type": "Recurrence"
    }
  }
}
In the graphical editor, the workflow should look like this:
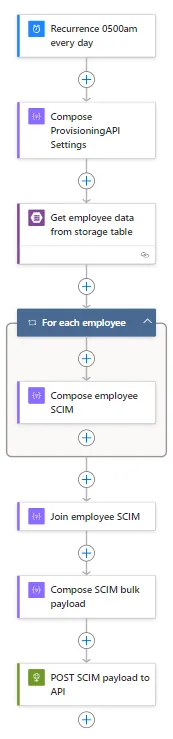 Figure 11: Complete Logic App workflow